I have been anxious to try a "twill" pattern. They intrigue me, partly because they are what is used to make tartans. There are many twill drafts available in 3-shaft patterns, which makes them readily adaptable to a rigid heddle loom such as I have, just by introducing a second heddle... without the need to use pick up sticks. I used the instructions at "Ask the Bellwether" that I pointed out in a previous post.
I picked out a twill pattern on handweaving.net, a "point twill," which means it has "turns." The pattern name is "Bullseye Twill."
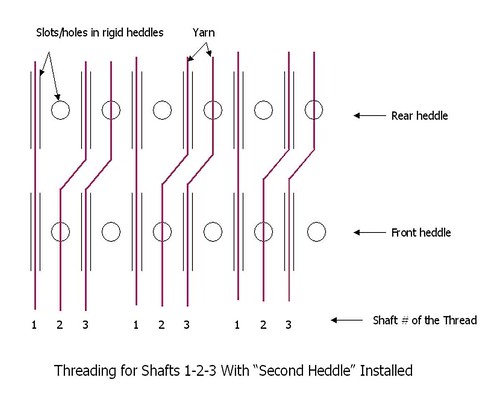
 The trickiest part was deciding how I wanted to thread the heddles. While a great deal of the threading is a straight 1-2-3 or 3-2-1, the "turns" are where it changes between the two. Because I'm using the two heddles to represent the three shafts, even a continuous 1-2-3 threading order gives an "extra" hole/slot for every three threads (compared to plain weave threading of just alternating slot/hole/slot/hole). The addition of "turns" just makes it even more different. When I first started thinking about it, I had the thought, "Maybe I should pick another threading draft that has a continuous 1-2-3 repeat..." But I didn't!
The threading, as advised by Ask the Bellwether, is:
Shaft 1: Slots on both heddles.
Shaft 2: Holes on front, slots on back.
Shaft 3: Slots on front, holes on back.
Easy-peasy, right? Well, if you want to end up (no pun intended) with one end in each slot or hole, to get the epi of the heddle (which I did, assuming a 10 epi heddle), then it is a bit of a challenge because the threading leaves one "spare" hole/slot out of every four. I solved that by going to a 12.5 epi heddle instead of 10 epi. Then, I could skip 25% (i.e. have three total ends for each four slots/holes in the heddle width).
The trickiest part was deciding how I wanted to thread the heddles. While a great deal of the threading is a straight 1-2-3 or 3-2-1, the "turns" are where it changes between the two. Because I'm using the two heddles to represent the three shafts, even a continuous 1-2-3 threading order gives an "extra" hole/slot for every three threads (compared to plain weave threading of just alternating slot/hole/slot/hole). The addition of "turns" just makes it even more different. When I first started thinking about it, I had the thought, "Maybe I should pick another threading draft that has a continuous 1-2-3 repeat..." But I didn't!
The threading, as advised by Ask the Bellwether, is:
Shaft 1: Slots on both heddles.
Shaft 2: Holes on front, slots on back.
Shaft 3: Slots on front, holes on back.
Easy-peasy, right? Well, if you want to end up (no pun intended) with one end in each slot or hole, to get the epi of the heddle (which I did, assuming a 10 epi heddle), then it is a bit of a challenge because the threading leaves one "spare" hole/slot out of every four. I solved that by going to a 12.5 epi heddle instead of 10 epi. Then, I could skip 25% (i.e. have three total ends for each four slots/holes in the heddle width).
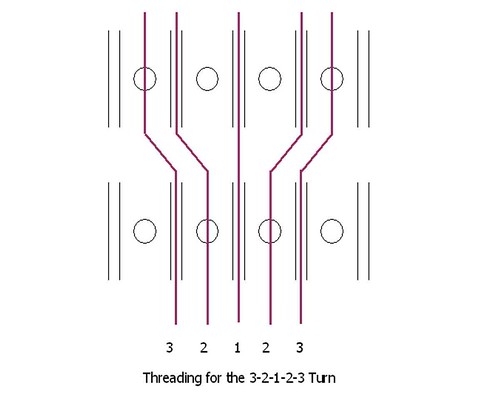
 The threading for a regular 1-2-3 order in the shaft threading is pretty simple, as shown above. If you refer to the Bullseye Twill draft, you'll see (represented by the black squares along the bottom of the draft) that there are sections in sequence of 1-2-3 or 3-2-1, but there are several "turns" of either 1-2-3-1-3-2-1 or 3-2-1-2-3. Those are not very hard to do either, though it does slightly throw off the "three threads in every four slots/holes" ratio.

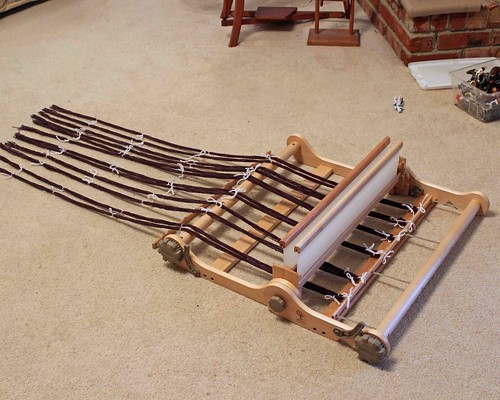
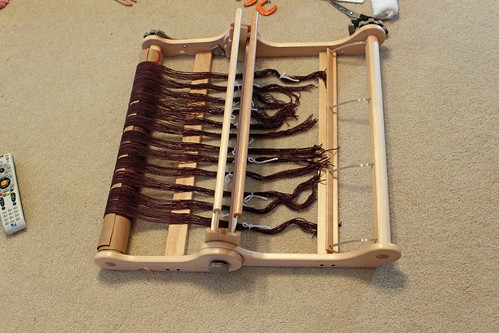
 Because of the "three out of four" aspect, I found it difficult to decide how I wanted to count out my "direct warp" (with two-end loops in slots), and then later “move” the ends. I avoided that step by pre-measuring a warp, winding it onto the back beam, and threading single ends into the holes/slots I wanted.
I wandered around the house, looking for likely warping tools. I kept staring at the banister, thinking it had a beautiful section of almost parallel spindles. So... I warped on the banister. I counted out six groups of twelve. With two ends per circuit, 144 ends is three width repeats of the draft.
What's wrong with this picture?
Because of the "three out of four" aspect, I found it difficult to decide how I wanted to count out my "direct warp" (with two-end loops in slots), and then later “move” the ends. I avoided that step by pre-measuring a warp, winding it onto the back beam, and threading single ends into the holes/slots I wanted.
I wandered around the house, looking for likely warping tools. I kept staring at the banister, thinking it had a beautiful section of almost parallel spindles. So... I warped on the banister. I counted out six groups of twelve. With two ends per circuit, 144 ends is three width repeats of the draft.
What's wrong with this picture?
 Oh, yeah... there's that small, incidental detail about tying the prepared warp at the crosses and keeping the ends in order... How was I to get it off of the banister, now? Well, I ended up tying the warp in a ten places, including twice very close to the end away from the cross, cutting the end nearest the cross, and uncrossing the ends to pull them off of the banister. Then, I tied the center of the warp to the back beam.
 I tried "tensioning" the bundles a bit, to wind on the back beam (using a heddle), but it didn't work very well. The bundles of 12 threads were no longer "in order" and wanted to spiral around each other. They just became more tightly twisted as I wound them onto the back beam.
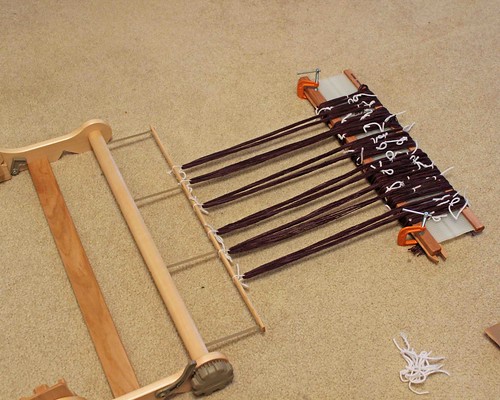 I took the heddle out of the warps and just laid them out as flat as I could manage and then turned them onto the back beam about one half turn at the time, straightening them each half turn. After winding them on the back beam, I threaded them as described above.
 Then, I just tied the groups of 12 in pairs on the front beam. Now, ready to weave! So, here is what it looks like to "raise" each shaft:
Shaft 1: Both heddles down (ends in both slots ride high, with ends in either hole pushed down):
Then, I just tied the groups of 12 in pairs on the front beam. Now, ready to weave! So, here is what it looks like to "raise" each shaft:
Shaft 1: Both heddles down (ends in both slots ride high, with ends in either hole pushed down):
 Shaft 2: Front heddle up, back heddle neutral:
 Shaft 3: Back heddle up, front heddle neutral.:
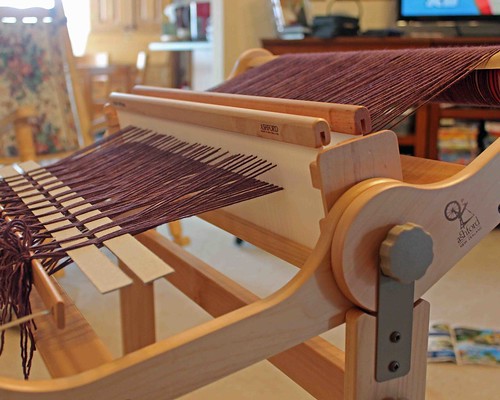
 After starting to weave, I realized I needed a "selvedge" thread on each side. I had to "do it" before I understood why a "floating selvedge" is used for twill. Just like the warp threading described above, the weft threads don't alternate every other row. When two rows of the draft have the same weft position, the weft thread doesn't wrap around the edge of the fabric. So... I tied on an extra thread on each edge and let it dangle off the back of the loom. It didn't take me very long to realize I had to tie weight on it.
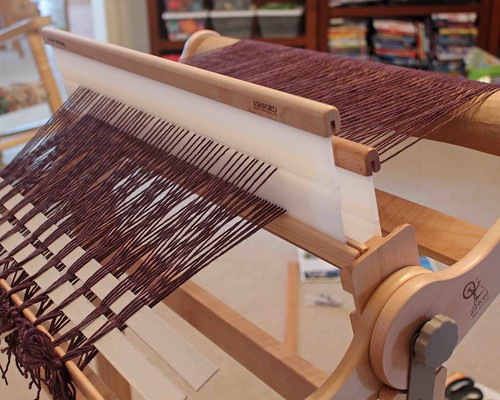
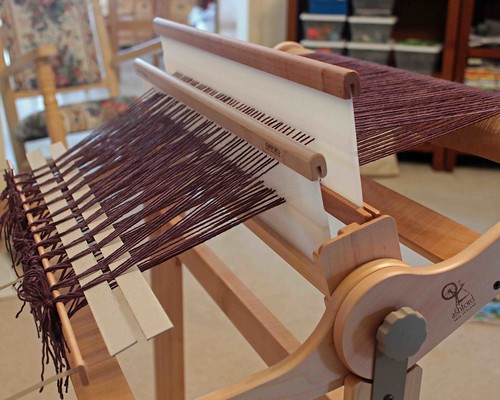
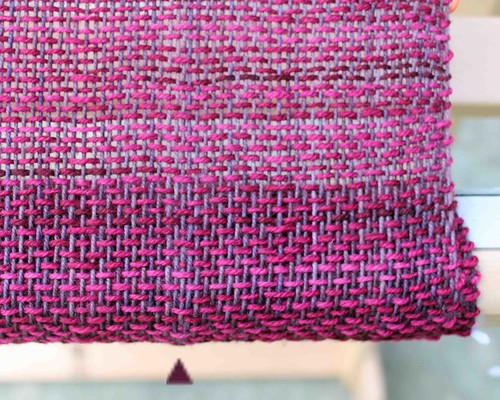
I have woven a couple of repeats. The area where the turn has no skipped holes/slots (the 3-2-1-2-3 turn) is noticeable as slightly tighter together (at arrow).
After starting to weave, I realized I needed a "selvedge" thread on each side. I had to "do it" before I understood why a "floating selvedge" is used for twill. Just like the warp threading described above, the weft threads don't alternate every other row. When two rows of the draft have the same weft position, the weft thread doesn't wrap around the edge of the fabric. So... I tied on an extra thread on each edge and let it dangle off the back of the loom. It didn't take me very long to realize I had to tie weight on it.
I have woven a couple of repeats. The area where the turn has no skipped holes/slots (the 3-2-1-2-3 turn) is noticeable as slightly tighter together (at arrow).
 Sometimes, "learning by doing" can be a painstaking process!
Happy Knitting,
Lisa Kay
ETA: Finished product, purses, posted here.
Sometimes, "learning by doing" can be a painstaking process!
Happy Knitting,
Lisa Kay
ETA: Finished product, purses, posted here.
The trickiest part was deciding how I wanted to thread the heddles. While a great deal of the threading is a straight 1-2-3 or 3-2-1, the "turns" are where it changes between the two. Because I'm using the two heddles to represent the three shafts, even a continuous 1-2-3 threading order gives an "extra" hole/slot for every three threads (compared to plain weave threading of just alternating slot/hole/slot/hole). The addition of "turns" just makes it even more different. When I first started thinking about it, I had the thought, "Maybe I should pick another threading draft that has a continuous 1-2-3 repeat..." But I didn't!
The threading, as advised by Ask the Bellwether, is:
Shaft 1: Slots on both heddles.
Shaft 2: Holes on front, slots on back.
Shaft 3: Slots on front, holes on back.
Easy-peasy, right? Well, if you want to end up (no pun intended) with one end in each slot or hole, to get the epi of the heddle (which I did, assuming a 10 epi heddle), then it is a bit of a challenge because the threading leaves one "spare" hole/slot out of every four. I solved that by going to a 12.5 epi heddle instead of 10 epi. Then, I could skip 25% (i.e. have three total ends for each four slots/holes in the heddle width).
The threading for a regular 1-2-3 order in the shaft threading is pretty simple, as shown above. If you refer to the Bullseye Twill draft, you'll see (represented by the black squares along the bottom of the draft) that there are sections in sequence of 1-2-3 or 3-2-1, but there are several "turns" of either 1-2-3-1-3-2-1 or 3-2-1-2-3. Those are not very hard to do either, though it does slightly throw off the "three threads in every four slots/holes" ratio.
Because of the "three out of four" aspect, I found it difficult to decide how I wanted to count out my "direct warp" (with two-end loops in slots), and then later “move” the ends. I avoided that step by pre-measuring a warp, winding it onto the back beam, and threading single ends into the holes/slots I wanted.
I wandered around the house, looking for likely warping tools. I kept staring at the banister, thinking it had a beautiful section of almost parallel spindles. So... I warped on the banister. I counted out six groups of twelve. With two ends per circuit, 144 ends is three width repeats of the draft.
What's wrong with this picture?
Oh, yeah... there's that small, incidental detail about tying the prepared warp at the crosses and keeping the ends in order... How was I to get it off of the banister, now? Well, I ended up tying the warp in a ten places, including twice very close to the end away from the cross, cutting the end nearest the cross, and uncrossing the ends to pull them off of the banister. Then, I tied the center of the warp to the back beam.
I tried "tensioning" the bundles a bit, to wind on the back beam (using a heddle), but it didn't work very well. The bundles of 12 threads were no longer "in order" and wanted to spiral around each other. They just became more tightly twisted as I wound them onto the back beam.
I took the heddle out of the warps and just laid them out as flat as I could manage and then turned them onto the back beam about one half turn at the time, straightening them each half turn. After winding them on the back beam, I threaded them as described above.
Then, I just tied the groups of 12 in pairs on the front beam. Now, ready to weave! So, here is what it looks like to "raise" each shaft:
Shaft 1: Both heddles down (ends in both slots ride high, with ends in either hole pushed down):
Shaft 2: Front heddle up, back heddle neutral:
Shaft 3: Back heddle up, front heddle neutral.:
After starting to weave, I realized I needed a "selvedge" thread on each side. I had to "do it" before I understood why a "floating selvedge" is used for twill. Just like the warp threading described above, the weft threads don't alternate every other row. When two rows of the draft have the same weft position, the weft thread doesn't wrap around the edge of the fabric. So... I tied on an extra thread on each edge and let it dangle off the back of the loom. It didn't take me very long to realize I had to tie weight on it.
I have woven a couple of repeats. The area where the turn has no skipped holes/slots (the 3-2-1-2-3 turn) is noticeable as slightly tighter together (at arrow).
Sometimes, "learning by doing" can be a painstaking process!
Happy Knitting,
Lisa Kay
ETA: Finished product, purses, posted here.
Comments
Thank you experimenting for me! :). I have been thinking about weaving with 2 heddles on my rigid heddle loom ever since my husband bought one for me. I am feeling mixed up about it until I came to this. Post of yours. I am glad you took a clear picture of the warp threads that seem a bit out of "spacing" compared to the others. I am curious if they appear the same or disappeared after wet finishing the cloth. Will you comment please?
Lisa Kay
Indirect warping is the answer of course! Now why didn't I think of that? This second heddle has been lying around unused for over a year, now I feel confident to get started.